Amazon Demand-Side Platform (DSP) is a powerful advertising tool that allows advertisers to programmatically buy display and video ads across Amazon’s vast network. This includes Amazon.com, IMDb, Kindle, and third-party websites and apps. With its advanced targeting options and robust reporting capabilities, Amazon DSP can help businesses of all sizes reach their desired audiences and achieve their marketing goals.
This article provides a comprehensive guide to setting up Amazon DSP, covering everything from accessing the platform to creating effective ad creatives.
Accessing Amazon DSP
Before diving into campaign setup, you need to gain access to Amazon DSP. There are two primary ways to do this:
- Amazon Managed Service: This option is suitable for advertisers who prefer a hands-off approach or have limited experience with programmatic advertising. Amazon provides a dedicated account manager who handles campaign strategy, setup, and optimization. However, this service typically requires a significant minimum ad spend, often in thousands of dollars, and involves account management fees.
- Managed Self-Service: This option offers more control and flexibility for advertisers who want to manage their campaigns directly. It is available through Amazon Agency Partners and allows businesses to leverage their expertise while retaining control over campaign parameters. By working with an Amazon Ads Partner, advertisers can bypass the minimum spend requirement, allowing for more budget flexibility.
Defining Campaign Objectives
Once you have access to Amazon DSP, the next crucial step is to define your campaign objectives. Clearly establishing your goals will guide your campaign strategy and help you select the most appropriate DSP ad types, inventory options, and targeting tactics. It’s crucial to align your campaign objectives with the key performance indicators (KPIs) you’ll be tracking.
For example, if your objective is to increase brand awareness, your KPI might be impressions or reach. By aligning your objectives and KPIs, you can ensure that your campaign is optimized for the desired outcomes. DSP campaigns can also work together seamlessly: a consideration campaign can drive traffic to your product pages, which can then be retargeted with a conversion campaign to boost sales. Some common campaign objectives include:
- Brand Awareness: Increase brand visibility and reach among your target audience.
- Consideration: Drive engagement with your brand and products, encouraging potential customers to learn more.
- Conversions: Generate sales and drive conversions by targeting high-intent shoppers.
Creating an Advertiser Account in Amazon DSP
Before you can start creating campaigns in Amazon DSP, you’ll need to set up an advertiser account. This account holds your brand information, billing details, and other essential settings.

Here’s how to create a new advertiser account:
1. Access the Advertiser Creation Form
- Navigate to the “Campaign Manager” section within Amazon DSP.
- Click on “Create Advertiser.”
2. Fill in the Advertiser Information
- Name: Enter the name of your brand or company.
- URL: Provide your company’s website address.
- Merchant Token:
- If you sell products on Amazon, select “This advertiser is a merchant using Amazon Seller Central” and enter your merchant token. This links your DSP account to your Seller Central account.
- If you’re not selling on Amazon, select “No, this advertiser is not a merchant using Amazon Seller Central.”
- Country: Select your country of operation.
- Currency: Choose your preferred currency for billing.
- Timezone: Select your appropriate time zone.
- Industry: Choose the industry that best represents your business.
3. Provide Contact Information
- Contact Name: Enter the name of the primary contact person for this account.
- Company Name: Enter your company’s name.
- Address: Provide your company’s complete address.
- Phone: Enter a contact phone number.
- Fax: (Optional) Enter a fax number if applicable.
- Email: Provide a contact email address.
4. Specify Invoice Details
Delivery Option: Choose how you want to receive invoices:
- One invoice for the advertiser account: You’ll get a single invoice for all campaigns.
- Separate invoices for each campaign: You’ll receive individual invoices for each campaign.
5. Configure Targeting Options (Optional)
- Domain Targeting: If you want to include or exclude specific website domains where your ads will appear, you can do so in this section.
6. Set Data Transparency Preferences (Optional)
- Pricing Transparency: You can choose to allow Amazon to disclose your advertiser name and payment information in their pricing transparency report.
7. Review and Save
- Carefully review all the information you’ve entered.
- Click “Save” to create your advertiser account.
Once you’ve created your advertiser account, you’ll be able to select it when creating new orders (campaigns) in Amazon DSP.
Creating an Order
Once you’ve created your advertiser account, you can begin setting up your campaigns (orders).
1. Select Advertiser: In the “Create Order” section, you’ll first need to choose the relevant advertiser account from a dropdown menu. This ensures that your campaign is associated with the correct brand and billing information.
2. Name/PO Number:
- Name: Give your order a descriptive name that clearly identifies the campaign (e.g., “Brand Awareness – Q1 2024”).
- PO Number: (Optional) If your organization uses purchase orders, you can enter a PO number here.
3. Goal and Optimization:
○ Goal: Select your primary campaign objective:
- Awareness: Increase brand visibility and reach.
- Conversions: Generate sales and other conversions.
- Consideration: Drive traffic to your product pages or website.
○ Optimization: (This might be on a separate screen) You’ll likely need to select a corresponding KPI for optimization based on your chosen goal (e.g., ROAS for conversions, DPVR for consideration).

4. Budget and Delivery:
○ Budget and Flights:
- Budget: Set the total budget for this order (campaign).
- Add Flight: Define the start and end dates for your campaign. You can add multiple flights to schedule different campaign periods.
- Budget Cap: Set a daily or monthly spending limit to control your budget more precisely. This is crucial for preventing overspending.
- Agency Fees: (Optional) If you’re working with an agency, you can apply an agency fee here.
5. Conversion Tracking:
- Products: Add the ASINs of the products you want to advertise. (Important: Remember to select “Yes with variations” to track the brand halo effect (sales of other products in your brand).
- Off-Amazon Conversions: (Optional) If you want to track conversions that happen outside of Amazon (e.g., on your own website), you can set up off-Amazon conversion tracking.
6. Targeting and Optimization:
- Frequency: Set a limit on how many times a shopper can see this ad. As mentioned earlier, you might prefer to set frequency caps at the line item level for more granular control.
- Frequency Group: (Optional) You can add this order to a frequency group to coordinate frequency capping across multiple campaigns.
Once you’ve completed these steps, review your settings and click “Save” to create your order.

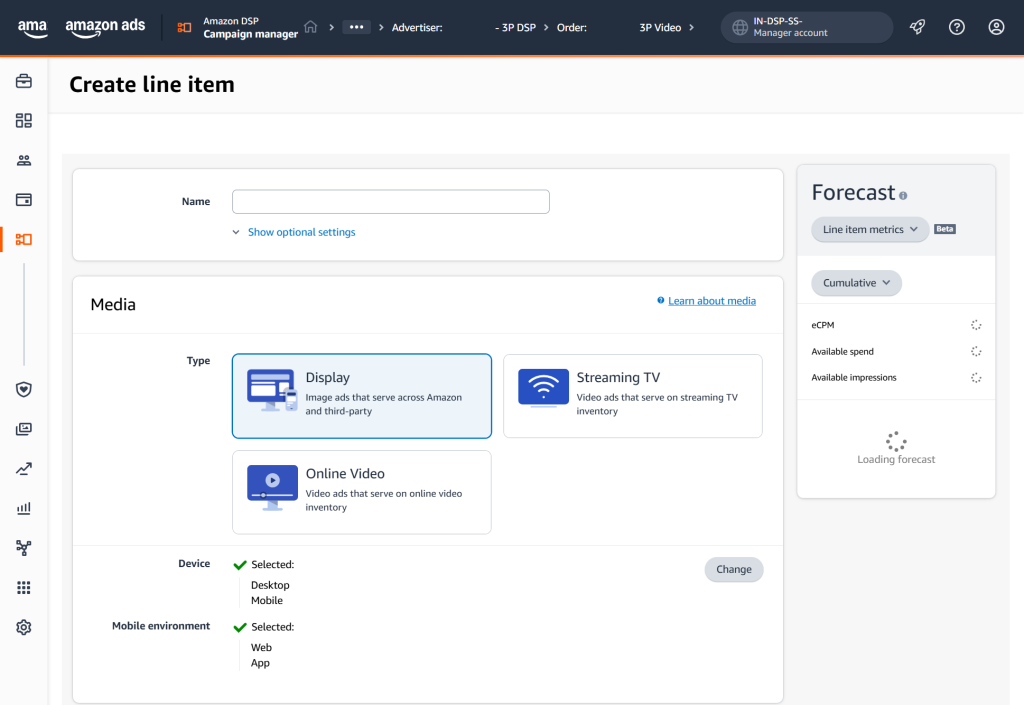
Creating Line Items
Line items are the building blocks of your Amazon DSP campaigns. They function similarly to ad groups in other advertising platforms, allowing you to target specific audience segments and control how your ads are delivered.
Here’s a breakdown of how to create a line item:
1. Select Advertiser and Order: Choose the advertiser account and the order (campaign) that this line item will belong to.
2. Name: Give your line item a clear and descriptive name that indicates its purpose and targeting (e.g., “Retargeting – Website Visitors – Mobile”).
3. Media:
○ Type: Select the format of your ads:
- Display: Standard image-based ads shown on websites and apps.
- Streaming TV: Video ads shown on streaming television platforms (e.g., Amazon Prime Video, Fire TV).
- Online Video: Video ads displayed on websites and within online video content.
4. Device:
○ Choose the devices you want to target:
- Desktop: Target users on desktop computers.
- Mobile: Target users on mobile phones.
- Tablet: Target users on tablets.
5. Mobile Environment:
○ If you’re targeting mobile devices, you may need to specify the mobile environment:
- Mobile Web: Ads shown within mobile web browsers.
- Mobile App: Ads shown within mobile applications.
6. Products & Services:
○ This section allows you to further refine your targeting based on the types of products or services users are interested in.
7. Schedule:
○ Flight Dates: Set the start and end dates for your line item.
○ Dayparting: (Optional) If you want to control when your ads are shown throughout the day, you can use dayparting to specify certain hours or days of the week.
8. Inventory:
○ Select Inventory Types: Choose where you want your ads to appear. Options may include:
- Amazon Properties: Amazon.com, IMDb, Kindle Fire apps, etc.
- Amazon Publisher Services (APS): High-quality websites and apps within Amazon’s network.
- Open Exchange: A broader range of third-party websites and apps.

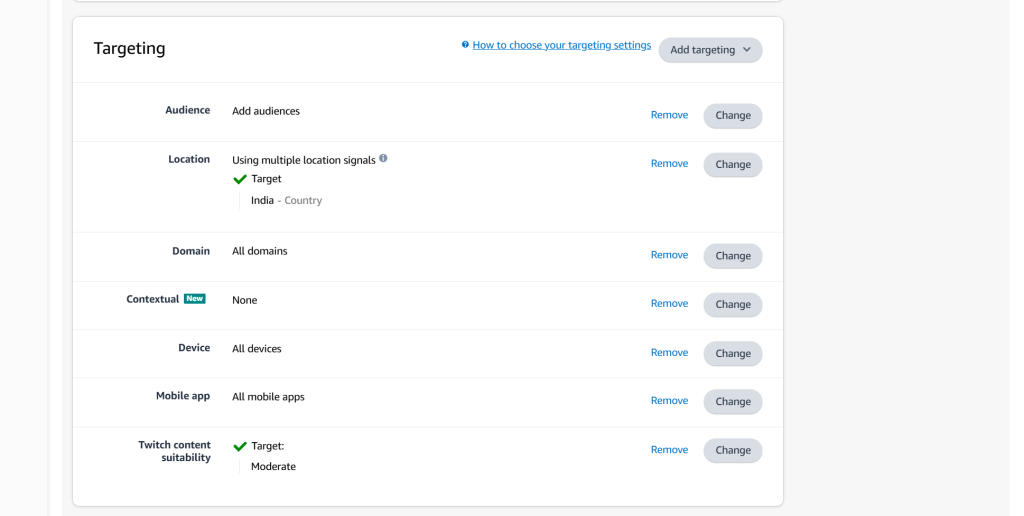
9. Targeting:
○ Refine your audience targeting:
- Segments: Utilize pre-defined audience segments provided by Amazon (e.g., demographics, interests, in-market audiences).
- Product Targeting: Target shoppers based on their interactions with specific products or brands on Amazon.
- Audience: Create and use your own custom audiences (e.g., website visitors, customer lists).
- Deal IDs: (If applicable) Target audiences interested in specific deals or promotions.
- Bulk Upload: (If available) Upload targeting criteria in bulk.
10. Delivery:
○ Pacing: Choose how you want your budget to be spent over the line item’s flight dates:
- Even pacing: Distribute your budget evenly.
- Accelerated pacing: Spend your budget more quickly at the beginning of the flight.
○ Frequency: Set a frequency cap to limit the number of times a user sees your ads within a given timeframe.

11. Bidding:
- Base Bid: Set your default cost-per-thousand impressions (CPM) bid. This is the amount you’re willing to pay for your ads to be shown 1,000 times.
- Minimum Bid (Optional): Set a minimum bid amount.
- Maximum Bid (Optional): Set a maximum bid amount.
Once you’ve configured all the settings, review your line item and click “Save” to create it.

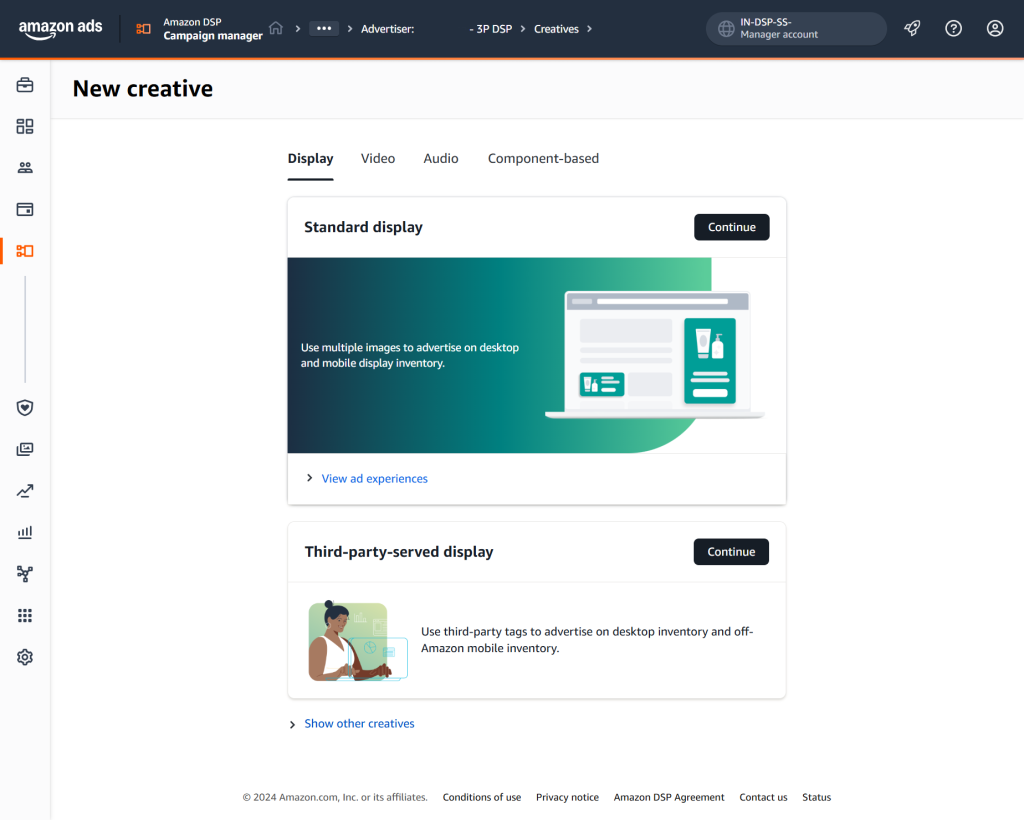
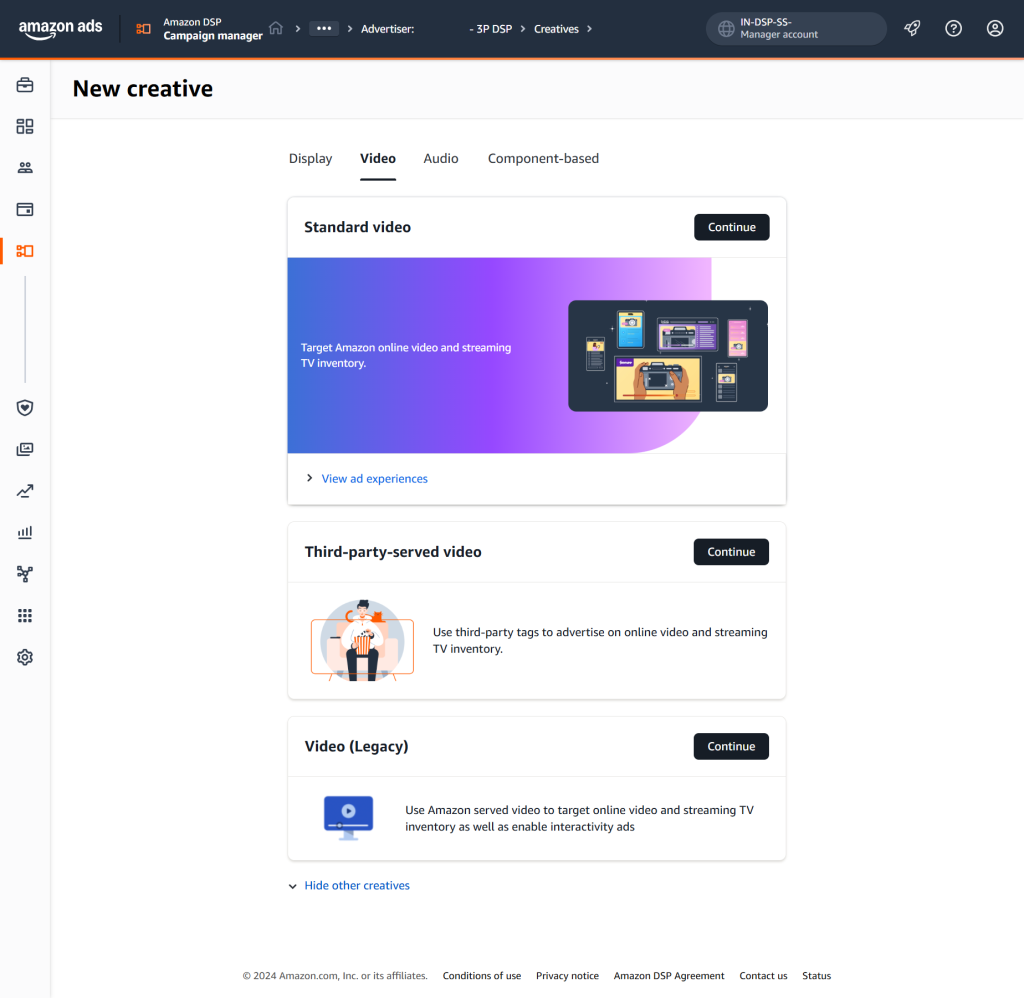
Creating Ad Creatives
Ad creatives are the visual and textual elements that make up your ads. They play a crucial role in capturing attention, communicating your message, and driving engagement. Amazon DSP offers a variety of creative formats to suit different campaign objectives and ad placements.
Here’s how you can create ad creatives in Amazon DSP:
1. Select Advertiser:
○ Choose the advertiser account that these creatives will be associated with.
2. Choose Your Creative Type:
○ Display: Create static image ads that can appear on various websites and apps.
- Standard Display: Use multiple images to optimize for different desktop and mobile inventory.
- Third-Party-Served Display: Utilize third-party tags to serve ads on desktop inventory and off-Amazon mobile inventory.
○ Video: Create engaging video ads for streaming TV and online video platforms.
- Standard Video: Target Amazon online video and streaming TV inventory.
- Third-Party-Served Video: Use third-party tags to advertise on online video and streaming TV inventory.
- Video (Legacy): Use Amazon-served video to target online video and streaming TV inventory and enable interactivity ads.
○ Audio: Develop audio ads for Amazon’s audio inventory, including interactive audio ads and podcasts.
- Audio: Target Amazon audio inventory.
- Audio – Interactive Audio Ads: Create interactive audio ads.
- Audio – Podcast: Create audio ads specifically for podcasts.

○ Component-based: (This option might not be available to all advertisers) Build more customized and interactive ads using various components.
Component-based creative: Use components or product ASIN details to deliver native or responsive ads. Click-through destinations can be on Amazon through native ads or other websites.
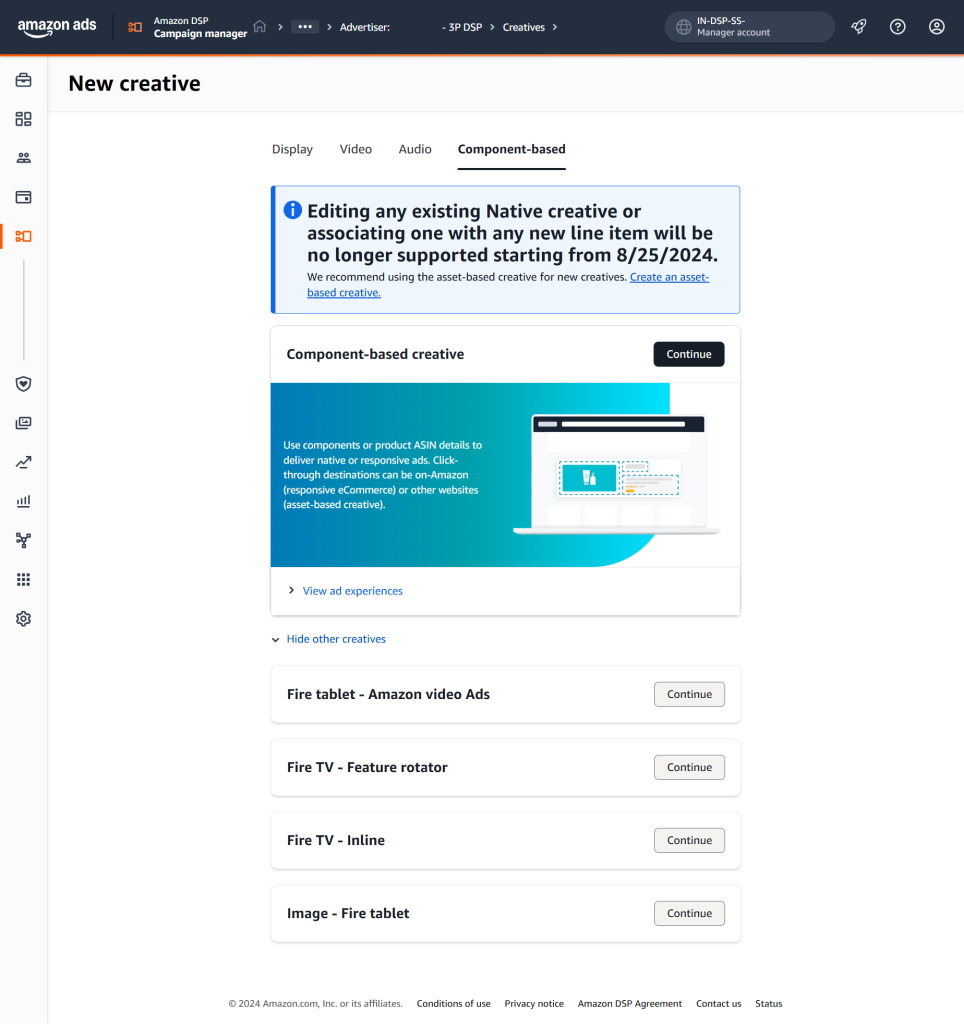
- Fire tablet – Amazon video Ads: Create video ads specifically for Fire tablets.
- Fire TV – Feature rotator: Design ads that rotate through different features on Fire TV devices.
- Fire TV – Inline: Create inline ads for Fire TV.
- Image – Fire tablet: Develop image-based ads for Fire tablets.
3. Design Your Creative:
- Follow Amazon’s creative guidelines: Ensure your creatives meet Amazon’s specifications for dimensions, file formats, and content.
- Use high-quality visuals: Use compelling images or videos that are relevant to your product or brand.
- Craft clear and concise messaging: Highlight the key benefits of your product or brand.
- Include a strong call to action: Encourage users to click on your ad or take a desired action (e.g., “Shop Now,” “Learn More”).
Conclusion
Amazon DSP is a powerful advertising platform that can help businesses achieve a variety of marketing objectives, from increasing brand awareness to driving conversions.
By following the steps outlined in this article, you can effectively set up and manage your Amazon DSP campaigns to reach your target audiences and maximize your return on ad spend. Remember to define clear campaign objectives, choose the right inventory and targeting options, create compelling ad creatives, and continuously monitor and optimize your campaigns for optimal performance.